Generic First Steps with WordPress
WordPress Administration Screens
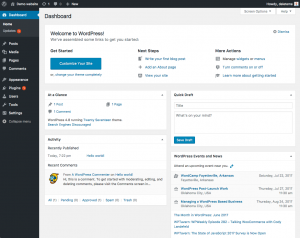
Now that you have an idea of how your site looks and what the different layout sections are called, it’s time to test drive the WordPress Administration. This is like familiarizing yourself with the backend of your new website. In fact, the first page you see after logging in is called the Dashboard, a collection of information and data about the activities and actions on your WordPress site.
The Dashboard helps to keep you up to date on new and interesting bits of information from the many WordPress resources. In the corner, it also features a list of the most recent activity you’ve accomplished on your site.
On the left side of the screen is the main navigation menu detailing each of the administrative functions you can perform. Move your mouse down the list and the sub-menus will “fly out” for you to move your mouse to and click. Once you choose a “parent” navigation section, it will open up to reveal the options within that section.
The various menu items are as follows:
The links in the above list will take you to a series of articles that will guide you step-by-step through every aspect of the Admin Screens. You are anxious to get started, so for now, let’s start with the Users Screen.
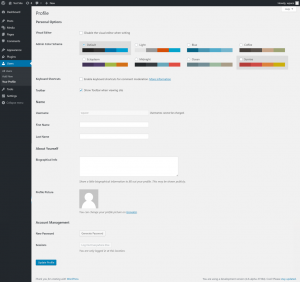
Click on the Users tab. The screen will change and you will see the Screen called All Users that shows a list of all your users; from here you can add or change existing users and authors accounts. In the navigation menu, click on the Your Profile menu choice. This is where you will enter information about you, the author and administrator of the site. Fill in the information and click Update Profile when done.
Now, let’s look at some other powerful features of the WordPress Admin.
Quick Changing the Look
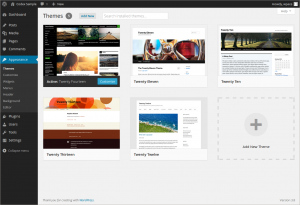
The Appearance, Themes Screen allows you to change the look of your site using different Themes. Themes are presentation styles that completely change the look of your site. Designed by WordPress developers and users, there are hundreds of themes available for you to choose from. In your Appearance Screen, you will see a list of currently installed themes, including the WordPress Twenty Seventeen theme. To quickly change the theme, simply click on the Activate button under one of the themes listed, then click on your site name in the top toolbar to see how it looks. Wow, you have another look and nothing else on the site has changed. It’s that easy.
Go back to the Appearance > Theme Screen and click the Activate button under the WordPress Twenty Seventeen theme to bring the design back to what you had. To see it again, click your site name in the toolbar, and there it is.
Writing and Managing Posts
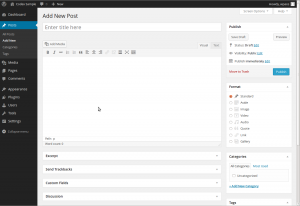
Back at the Administration Screen, take a look at the Posts Screen. You can use the tabs under the Posts Menu to write and manage your posts. Let’s start by making your first test post in the Add New tab.
If the screen looks a little intimidating, the Codex article on Writing a Post will take you step-by-step through the process of writing a post. Take a moment to read through the article and post your first entry and then return to this article and we’ll take you onto the next step.
If you are in a hurry, then simply fill in the blanks, one by one, in the post beginning with the title and then write a little test message in the post window. This is just for a test, so you can write anything you want. When you are done, click the Publish button that is to the right of the post entry window and it is done. You will then see a blank Write a Post screen and you’re ready to write another post. Go ahead. But do only three to four entries. There’s more exciting work ahead!
Now that you’ve gotten a feel for writing posts, you can view your posts by clicking your site name in the toolbar on top of the screen. Now it’s time to get down to the real work.
Planning Session
If you want to create a good and solid website, you need a good and solid plan. I know it’s hard to do, and I know you want to keep playing with your new website, but it’s time to take a break away from your computer and turn to pen and paper.
On a piece of paper, describe your site. Take five to twenty minutes to come up with a purpose for your site, or better yet, call it your Mission Statement.
Answer the following questions:
- What am I going to do with this?
- Who is going to read this?
- What kinds of information will I be posting?
- Why am I doing this?
- Who am I doing this for?
- How often am I going to be posting and adding information?
Now, compile this information into a paragraph so it looks like this:
This website will be dedicated to X, Y, and Z,
and cover the topics of A, B, and C. The audience will
be __________ ________________ _______. I will be adding
posts every _____________ about ________ _______ ______________.
I am doing this because _____________ _____________ __________________.
Using the Information
From this exercise, we’ve gathered a lot of information. We’ve uncovered information on how you might layout and design your site. If you know your audience is mostly made up of young people under the age of 25, you will probably want a fashionable look ranging from wild colors and crazy graphics to dark foreboding tones. If you are providing factual information about a serious subject, then you will probably want a more conservative look where the information is more important than a lot of pop and flash.
You may already have a design idea in mind, or perhaps you will be copying over from your previous site, but take a moment to use this information to reconsider your design, and to see how what you want will work with the WordPress options.
You have also uncovered the possible categories for your site. The topics and subjects you will be covering are listed in your purpose statement. Let’s say your purpose statement said,
-
-
- “The website will be dedicated to providing news and information on computers, web pages, and the internet and cover the topics of computer tips, web page design, and internet news.”
-
Your topics are your categories. Write your categories down below your purpose paragraph and notes about your web page design.
Now, what subcategories might be under these topics? Under Computer Tips, you might want to segregate them by Windows, Linux, and Mac. Or maybe Software and Hardware. You can have sub-sub-categories, but let’s stop with subcategories for right now. Write these down.
Remember the question about why you are doing this? Is it because you have valuable and timely information or knowledge to share, because you want to talk about a subject that interests you, or maybe because you just think it will be fun to do.
Understanding the timeliness of the information you want to present on your site helps you organize the information on your website. Your website is organized by several different methods. If the date of when you posted the information is critical to the success of the page, then having links to your posts referenced by date is important. If the information itself is more important and timeless, then having your posts referenced by category is the best choice.
Have you noticed that you are starting to lay out your website? If you remember our earlier test drive of your new WordPress website, we examined the sidebar menu. This is the area where your past posts are organized. If you take another look, you will see the sidebar is laid out in a list, including Archives by date and Categories by category. It may even feature a calendar.
As you lay out your website on paper, consider whether you want both categories and dates, or just one of them in your sidebar. What information you have and how you want to help the user find the information is critical to your website design.
As you think about what information the user will need to know, you have to consider what information you are willing to share with them. That information may include how to contact you, what the purpose of the site is, who you are, and what your expertise is.
A WordPress feature called Pages makes the process of presenting this information easier. Pages, similar to posts, are most commonly used to present unchanging information such as About Us, Contact Us, Sign Up for Our Mailing List, and other staticinformation. Before creating your individual Pages, you need to think about what information you would like the Page to hold. Write down the possible Page titles and describe the information you want to share on each Page.
Comments
Part of the fun of WordPress is the ability to have viewers leave comments on your site. It creates a dynamic interchange between you and the viewer. Do you want comments on your posts? Comments on posts come in a variety of forms, from pats on the back (Good job! Like the post!) to extensive conversations and commentary about the posts. Or maybe you are seeking comments that add to the information you’ve posted.
Responding to comments and moderating them can also take up a lot of time. If they are critical to your site, then include them and consider how you want them presented. Go back to your test site; the first post created at the time of installation included a sample comment. You can even make a few comments yourself on the posts you created. Take a look at how they are laid out and consider how you might want them to look to fit into the design and layout of your site.
When you have reached your decision about how you want to handle comments, take time to read through the article on comments and WordPress discussion options to help you set those features.
With this basic information, you are ready to return to your computer and start setting up your site.
Setting Up Your Site
You may want to install plugins such as Jetpack by WordPress.com to supercharge your website, and don’t forget to activate the Akismet WordPress Plugin that is available with all WordPress sites to help protect it from comment spam.
But now, let’s start with making those categories you wrote down before.
Create Categories
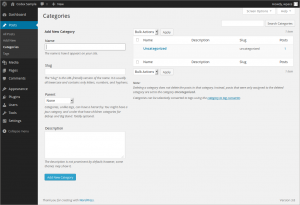
In the Posts > Categories tab, in the Add New Category area, fill in the information about your category. Continue to add your parentcategories, going down the list. Hold off on entering subcategories until all the main categories are entered.
-
- NOTE: You can add any new categories at any time, but make a note of the fact that categories can be sorted in WordPress in two ways: by name (alphabetically) or by ID number. As you enter the categories, they are assigned an ID number. It is difficult to change this, so if you don’t want your categories sorted alphabetically, enter them in the order you want to see them presented on the screen.
When you have the parent categories entered, enter your subcategories. In the pull down menu for Parent Category, you can select the parent to the subcategory you are adding. When you view your categories in the Manage > Categories Screen, you will see the categories listed like this:
Computer Tips
- – Windows
- – Linux
- – Mac
Internet News
Web Page Design
- – Web Standards
- – WordPress
- – – Plugins
- – – Themes
Put Posts into Categories
Let’s put some of your test posts into categories so you can see how this works.
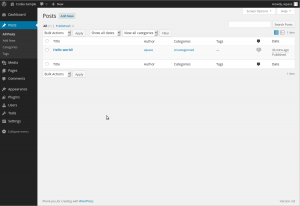
From the Posts > Category Screen, click on the tab for All Posts. You should see the test posts you entered here. When you hover your mouse over each post title, under the title, you should see the Edit | Quick Edit | Trash | Viewlinks. Click on Edit to edit one of the posts. On the right side of the Edit Post screen you will now see your Categories. Choose one of them by clicking in the box next to it. Then in the Publish module above, click the Update button. Repeat this for your other test posts, putting each one in a different category.
Now view your page by clicking on your site name in the toolbar at the top of your Administration Screen. Do you see the categories listed in the sidebar now? Great. If you are missing a category, that usually means that there are no posts in it. This is the default function of WordPress, so not to worry. When you add a post to the “missing” category, it will appear on your web pages. Click on one of the categories and you will be taken to a page for just that category. You should see the posts that went into that category. This is a generated Category page.
Now, click on the Archives for the month showing. Now you are visiting a generated page of your posts listed in chronological order for this month – well, specifically for today only. Two methods of finding the same information.
Preventing Spam
There is more to think about when it comes to having comments on your site. Unfortunately we live in a world where spam is a fact of life. It is recommended that you begin battling the comment spammers with the helpful article, Introduction to Dealing with Comment Spam.
What Is Next
You’ve now done all the basics for your new WordPress website. You know how to write a post, create a category, and how to view your site’s information by category and archive. You can start the customization process, and when you are done, don’t forget to delete your test posts! Then start writing some wonderful information to share with your new-found public!


